Make your own Storage Engine for Multer in TypeScript
Before jumping right into making your own storage engine, let's discuss why we need it in the first place and some of its applications.
Here’s the link to the GitHub repo for the following tutorial.
At this point, I assume that you have a clear idea of what multer is and what it is used for. Just to be on the same page here is a quick introduction to multer in its “out-of-the-box” form:-
So basically multer is used to parse data from HTTP requests withContent-Type header set to multipart/formdata . Content-Type header in an HTTP request describes the types of resources shared over the network. And these resources need special middlewares to be parsed and made available in the server-side application. Content-Type header of application/json, application/x-form-www-urlencoded, text/html can be parsed via body-parser but multipart/formdataneeds a different middleware i.e. multer. mutipart/formdata Content-Type means that apart from JSON or plain text data, resources may have Blob or File type fields as well. Without these middlewares, we won’t be able to use the resources sent over by the user. The req.body we use so casually in an express app, would have always returned an empty object if it wasn’t for these middlewares.
Now that we have a fair idea about multer, let's discuss the need for a custom storage engine and make one using TypeScript.
Storage Engines in Multer.
Storage engines are basically classes that deal with the file once they are parsed this includes storing, deleting, and modifying the original file. By default, multer comes with 2 storage engines, DiskStorage, and MemoryStorage. DiskStorage stores the file on disk at a given location whereas MemoryStorage stores the file’s content as a buffer in the application’s memory.
Need for Custom Storage Engines.
Two storage engines that come served with multer are useful for generic cases but think about it, would you store files for a big application in the memory or disk of your server or would you rather use cloud storage options like Google Cloud Storage or Amazon S3? Or maybe all you want to do is to read the file and store relevant data in a database and not save the entire file. This is exactly why one might need to write their own storage engine for multer.
Now, most of the stuff can be achieved via the built-in storage engines themselves but such solutions are tedious and increase the load on your application. For example, you might save a file on your disk then upload it to cloud storage, and then delete the file but it is like making 3 left turns instead of a right turn and maybe it’s just me but this sounds like too much commitment and responsibility.
Talk is cheap, show me the code.
Hopefully, by now you have realized the importance and use cases of custom storage engines in multer and are ready to make one of your own. I assume that you a fair idea about TypeScript so without any further ado let’s just jump right into it. In this tutorial, we will be making a storage engine that uploads the file directly to Google Cloud Storage.
Project Setup
Create a folder and inside the folder run the following commands to init package.json and typescript config file.
$ npm init --y && tsc --initConfigure your typescript compiler by simply editing tsconfig.json and make the root directory as specified in the configuration. I will be working this src as my rootDir and lib as outDir. Here is my tscconfig.json .
Configuring the Storage Engine
Now, inside src add a new folder “config” and add a new file “GcsEngine.ts”. Storage engines are classes that have two functions that are responsible for manipulating the file, these functions are _handleFile and _removeFile . _handleFile is responsible for manipulating/uploading the file. This is basically the heavy lifter and most of the work would be done in this function only. On the other hand _removeFile is responsible for deleting the file in case of any error in the future.
Our CustomStorageEngine would implement multer’s StorageEngine interface. So basically CustomStorageEngine should match the type signature of multer.StorageEngine which is given below:-
Now, let’s define our own class implementing the above interface. Remember that the type signature of the functions defined in our class also needs to match the above type.
One thing you should know before moving ahead is that in _handleFile function, file has a property stream which is a node.js ReadableStream and this is what we will be using to read the uploaded file and process it further.
Now, we need to define some members of this class. These members would facilitate our file handling. So, let’s see what all we would need.
First, we need a way to upload file , as discussed earlier, we can access data of uploaded file via file.stream which is a readableStream but where and how are going to upload it to cloud storage?
For uploading the file, we would first, use Cloud Storage Bucket to create a file, and then using this newly created file on the cloud, we will create a node.js WritableStream, further, we would pipe the data from file.stream (a ReadableStream) to newly created WritableStream. Confused? Refer to these links for a detailed introduction to Google Cloud Storage, Node.js Client for Cloud Storage, Readable and Writable streams in node.
So, now it’s pretty clear that we need Cloud Storage Bucket to handle the uploading of files. But, we also need names for the files we want to upload along with some configuration options that are required while creating a WritableStream, these options are available here. Okay enough blah blah let's start filling up our custom class.
constructor Function
Here we have completed the constructor function for our class which needs an options object(opts) of type Options , this includes Cloud Storage Bucket, bucket (required), options for creating WritableStream, options(optional), and a file naming function, nameFn(optional). nameFn would take request(Request) and file(Express.Multer.File) as arguments so that users could decide how they want to construct and return a unique name for the file. If a user doesn’t provide a naming function of their own, then we will use defaultNameFn .
Now let’s start completing the _handleFile function.
_handleFile Function
The callback function (cb) in _handleFile function takes two arguments, error and info . Here info is an object containing extra information about the file (in our case, the name of the file in the bucket) that needs to be added to the file’s metadata and made available to the next request handler in the pipeline via req.file/req.files . And according to the type definition of multer. StorageEngine, this info object must extend Partial<Express.Multer.File> .
Other than this in _handleFile function, we are first getting a unique name for file using nameFn, creating a new file with the same name in the bucket, obtaining WritableStream from this file, and piping data from file.stream to fileWriteStream and in case of error, closing the WritableStream and deleting the file if it exists. If data was written successfully, we simply add a new field name to the uploaded file’s metadata.
_removeFile Function
_removeFile function is responsible for deleting/removing files in case of some error in the future. This function would receive file with all the properties we appended in _handleFile (in our case, name). So, simply we would delete the file with name = file.name if found in the bucket.
Wrapping up GcsEngine.ts
Finally, we would export a function that would receive opts of type Options which would be used to create and return a new object of our class.
Finally, here is our Custom Storage Engine:-
Example Express Server
Create a new folder in src named “example” and write the following code to the new file “server.ts”.
Testing
Open a terminal to the “example” folder inside “src” and run the following command to start the server:-
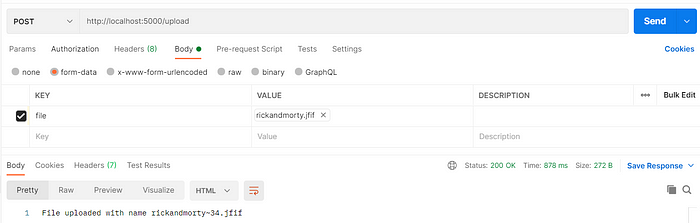
$ npx ts-node server.tsSend post request to http://localhost:5000/upload with a file attached to the field named “file”. I am using postman for testing and here’s a snapshot of the same:-
Wrapping Up
That’s it. We made a simple Custom Storage Engine for multer to directly upload files to Google Cloud Storage. Here’s the link to the GitHub repo containing all the code.
In this repo, I have added a validator that would run before uploading the file so as to prevent unnecessary uploads if req.body is invalid. I wanted this tutorial to be short and precise hence I did a little extra in the repo only.
Also, check out multer’s official guide to create a custom storage engine here.
Thank you for reading. Have a nice day!
More content at plainenglish.io