Angular: DOM Sanitization
If you are thinking about how to protect your Angular app from XSS attacks, then you must be relieved to know that Angular has provided built-in protection from these attacks.
In this story, we will check the below concepts:
=>In-built and explicit sanitization
=>Bypass the in-built sanitization.
=>Enforcing Trusted Types locally and using nginx web server
Let's begin!
I. In-Built Sanitization
XSS(Cross-site scripting)enables attackers to inject malicious code into web pages. Such code can then, for example, steal user and login data, or perform actions that impersonate the user.
To block XSS attacks, you must prevent malicious code from entering the DOM.
Angular, by default, doesn’t trust any values inserted into the DOM. Whenever a value is inserted into the DOM via property binding or interpolation, angular sanitizes and escapes the entire value or a portion of the value that it doesn’t trust.
safeHtml:string=”<i>Welcome to DOM Sanitization</i>”;Above is a property safeHtml, which we are rendering in the template in 2 ways: using interpolation and innerHTML.
<div><label>Rendered via interpolation:</label><span>{{safeHtml}}</span></div>

<div>
<label>Rendered via innerHTML:</label><span [innerHTML]=”safeHtml”></span>
</div>
This is how it looks like in the browser:

I have updated the safeHtml property as below to add a style attribute to the <i> tag.
safeHtml:string=”<i style=’color:red’>Welcome to DOM Sanitization</i>”;If we now check how its rendered in the browser. Although using interpolation, the <i> tag shows as expected, using innerHTML, the style attribute has had no effect. Also observe the WARNING message in the console tab. Angular has executed the in-built sanitization and stripped the style attribute from the <i> tag.

On inspecting the <i> tag in the developer tools, observe that it actually doesn’t have any style attribute.

I have created another property unsafeLink to demonstrate sanitization.
unsafeLink=”<a href=’javascript:alert(`danger`);’>Click Me Please !!</a>”I will render this <a> tag in the template as below using innerHTML.
<span [innerHTML]=”unsafeLink”></span>This is how it renders in the browser. Observe the WARNING message in the console tab.

When I inspect the <a> tag in the developer tools, angular has prepended an “unsafe:” string to the href attribute.

When I click on the <a> tag, observe the error message below. Angular has successfully prevented the user from opening the alert window.

II. Bypass Sanitization
Continuing from the unsafeLink property, if the developer trusts the URL associated with the <a> tag, then he/she can bypass the in-built sanitization performed by angular.
I have created a new property bypassedLink as below:
bypassedLink:SafeHtml|undefined;Within the constructor, I have created a reference for the DomSanitizer class as below.
constructor(private sanitizer: DomSanitizer){}Within the ngOnInit() lifecycle hook, I have initialized the bypassedLink property as below. We have called the bypassSecurityTrustHtml() on the sanitizer reference and passed the value of the unsafeLink property as argument to the method.
ngOnInit(){
this.bypassedLink=this.sanitizer.bypassSecurityTrustHtml(this.unsafeLink)
}
Lets now update the template to render the bypassLink property.
<span [innerHTML]=”bypassedLink”></span>In the browser console, we no longer have any WARNING messages.

The href attribute of the <a> tag is intact and has not been sanitized.

Finally, when I click on the link, I do get the alert dialogue as expected with no errors in the console.

You have other methods that can also be used to bypass sanitization based on the content to be sanitized.
For html content, we used bypassSecurityTrustHtml().
For styles, use bypassSecurityTrustStyle().
For scripts, use bypassSecurityTrustScript().
For URLs in hyperlinks, use bypassSecurityTrustUrl().
For resource URLs(i.e locations that contain executable code), use bypassSecurityTrustResourceUrl(). eg: <script src>
If you are bypassing the sanitization in multiple places in the application, opt for reusable pipes.
Below is a reusable pipe for bypassing sanitization for html content.
You can apply this pipe to unsafe html content like below:
<span [innerHTML]=”unsafeLink | bypassSanitization”></span>Similar pipes can be created for other content types like script, URL, styles and resource URL.
III. Explicit Sanitization
Consider a scenario, where the application server is providing the angular app with some html content and you are rendering the content in the 2 <span> tags with references unsafeContentElement and sanitizedContentElement below.
<div>
<label>Unsafe Link:</label><span #unsafeContentElement></span>
</div>

<div>
<label>Unsafe Link Sanitized Explicitly</label><span #sanitizedContentElement></span>
</div>
We are accessing these <span> elements via @ViewChild in the class.
@ViewChild(‘unsafeContentElement’,{static:true})unsafeContentElement:ElementRef | undefined;
@ViewChild(‘sanitizedContentElement’,{static:true})sanitizedContentElement:ElementRef | undefined;
Updated the constructor to add a reference to the Renderer2 class.
constructor(private renderer:Renderer2,private sanitizer: DomSanitizer){}In the ngAfterViewInit() lifecycle hook, updating the content of the <span> tags as below.
ngAfterViewInit(){

this.renderer.setProperty(this.unsafeContentElement?.nativeElement,’innerHTML’,this.unsafeLink);

//explicit sanitization
const sanitisizedLink=this.sanitizer.sanitize(SecurityContext.HTML,this.unsafeLink);
this.renderer.setProperty(this.sanitizedContentElement?.nativeElement,’innerHTML’,sanitisizedLink);
}
The innerHTML property of the first <span> element with reference unsafeContentElement has been updated with the value of the unsafeLink property.
In the case of the 2nd <span> element, we have explicitly sanitized the value of the unsafeLink property using the sanitize() of the DomSanitizer class.
As per the angular documentation, the sanitize() “Gets a safe value from either a known safe value or a value with unknown safety.”
So we have updated the innerHTML of the 2nd <span> element with the result of the sanitize() of the DomSanitizer class.
Its recommended to go for property binding,to take advantage of automatic sanitization of the data. But in scenarios, where it is not possible, explicit sanitization comes to the rescue.
In the browser, we have a WARNING message, as expected for the 2nd <span> tag.

Inspecting the 2 <span> elements, the first <span> element remains intact and the 2nd <span> element has been sanitized. Observe the “unsafe:” prepended to the href attribute of the 2nd <span> element.
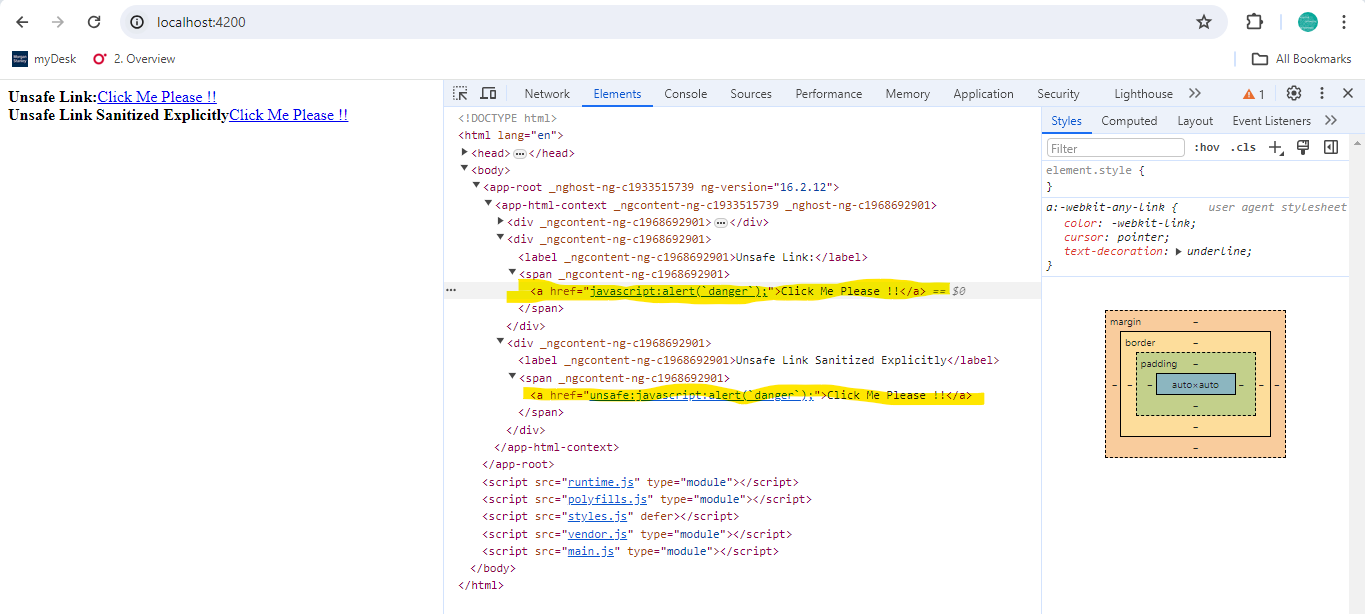
Clicking on the 1st <span> element, does show the alert dialogue.

Clicking on the 2nd <span> element throws an error message in the console. The explicit sanitization by the developer has prevented the user from opening the dangerous dialogue.

Observations to note:
=>The built-in browser DOM APIs or other libraries that manipulate the DOM, don’t automatically protect you from security vulnerabilities. Although we had updated the innerHTML property of the 1st <span> element to the unsafeLink property using Renderer2 class, this has not automatically sanitized the value of the unsafeLink property.
=>It is recommended to avoid directly interacting with the DOM and instead use Angular templates where possible AND/OR Enforce Trusted Types for the angular application.
What are Trusted Types ?
Client-side XSS attacks happen when data controlled by a user eg: input into a form field, reaches a function that can execute that data. These functions are known as injection sinks. An injection sink is any Web API function that should only be called with trusted, validated or sanitized data.
Trusted Types will force you to sanitize the data before passing it to any injection sink rather than use a string. This ensures that the data is trustworthy. Trusted Types are used to prevent client-side XSS.
Trusted Types works alongside Content-Security Policy with the trusted-types and require-trusted-types-for directives.
You can use the Trusted Types as an additional layer of security after enforcing the basic Content Security Policy directives like style-src, img-src, script-src, font-src,frame-src,connect-src etc.
To demonstrate enforcement of Trusted Types for the application, lets deploy the angular application to nginx webserver.
Below is the nginx.config.
Observe the add_header directive, where we are setting the Content-Security-Policy response header with angular policies. Please check https://angular.io/guide/security#enforcing-trusted-types for information on the angular policies.
add_header ‘Content-Security-Policy’ “trusted-types angular angular#unsafe-bypass; require-trusted-types-for ‘script’”;require-trusted-types-for ‘script’ means that using strings with injection sinks is not allowed.
In trusted-types angular angular#unsafe-bypass , angular and angular#unsafe-bypass are policy names.
As per the angular policy, any inline template values or content sanitized by Angular is treated as safe.
The angular#unsafe-bypass policy must be enabled if the application is bypassing the sanitization using DomSanitizer class.
Below is the Dockerfile
Below is the docker-compose.yml
Executing “docker compose build” and “docker compose up”.
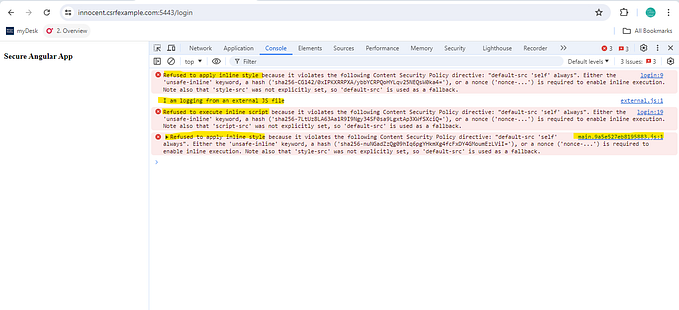
Hitting localhost:8081 in the browser. Observe the “Content-Security-Policy” response header highlighted.

Note that the content of 2 <span> elements has not rendered. We also have an error in the console.

How can I enforce the Trusted Types for local development and testing ?
Update the “serve” section of the angular.json as below. We have added an additional headers property to specify the Content-Security-Policy.
You can now run “npm run start” and hit localhost:4200 in the browser. It works exactly the same way.


With this error in the console, we understand that when Trusted Types is enabled, the browser accepts only a TrustedHTML object for injection sinks that expect HTML snippets.
We have not only TrustedHTML objects, we also have TrustedScript and TrustScriptURL objects.
Following are the ways you can use to fix a Trusted Type violation. I wont be getting into details. Please do check https://web.dev/articles/trusted-types for detailed explanation.
=> Remove the code that is violating the Trusted Type.
=>Use a library(eg: DOMPurify)that generates Trusted Types you can then pass into the injection sinks.
=>Create a Trusted Type Policy or use the default policy.
In Plain English 🚀
Thank you for being a part of the In Plain English community! Before you go:
- Be sure to clap and follow the writer ️👏️️
- Follow us: X | LinkedIn | YouTube | Discord | Newsletter
- Visit our other platforms: Stackademic | CoFeed | Venture | Cubed
- Tired of blogging platforms that force you to deal with algorithmic content? Try Differ
- More content at PlainEnglish.io